Wednesday, 6 April 2016

CA API gateway uses SAML with onelogin.com

Some time ago I wrote a blog entry for CA's API community side. Today I want move this a little bit by linking it to my own side.

The CA API Gateway can be configured to act as Service provider (SP), Identity Provider (IdP) or both. In this sample the Gateway is used as SP and the IdaaS platform onelogin.com is used as IdP. The communication is configured to use SAML 2.0. The sample are developed by Ben_Urbanski I think, see attached XML files.


First of all I set up the to service for SP and Idp in the gateway to work as designed.


  1. Create a "Publish Web API" as SP with custom resolution path as "/saml2/websso/serviceprovider"
  2. Import the policy SAML SSO ServiceProvider.xml into the above service.
  3. Create a "Publish Web API" as IdP with custom resolution path as "/saml2/websso/identityprovider"
  4. Import the policy SAML SSO IdentityProvider.xml into the above service.
  5. Check it is working with the URL "http://explore.apim.ca:8080//saml2/websso/serviceprovider" in your browser
  6. You should be redirected to a login page on the gateway.

For more details, please see the original post on Post in CA API Forum

Wednesday, 28 October 2015

Rename multiple files on Mac

Surprisingly I found it difficult to rename a bunch of files on the commandline. After research some time I came up with the following

I want to rename files recursively  like


./org/inb/bsc/xpointer/PointerPart.java?format=raw

into 

./org/inb/bsc/xpointer/PointerPart.java


find . -name "*raw" -exec sh -c 'mv {} "${0/\?format=raw/}"' {} \;

Tuesday, 24 March 2015

Have 2 Android emulators running with different IMEI


I recently had to test with two laptops with the Android emulator and tried to register with the same Mobile Api Gateway. 
The first “device” successfully registered, but he second received a device already registered.

The reason for that is the usage of the IMEI number together with some other fixed gateway number
as device-identifier.
The IMEI number for the emulator is 000000000000000 which is the same for all emulators and is
not changeable in the emulator or any other configuration file.

A way to circumvent this, is to change the IMEI number inside the emulator-x86.exe with a hexeditor like notepad++

Search for “+CGSN”, the following   000000000000000 is the IMEI number. Change to the desired number and the save the file. 

Thursday, 12 March 2015

Delete MAG Kit from CA API Gateway

I recently had to delete the MAG kit after some tests and ran into relationships between the installed fragments, encapsulated assertions and policies using them. Here is the simple solution for removing an installed MAG kit.


  1. Open Tasks->Manage encapsulated assertions
  2. delete all assertions starting with the Prefix you want to delete e.g. mag
  3. now delete the folder for your prefix e.g. MAG-2.2.01 mag
  4. you will receive some errors for still referenced policies, fragements and folders. Press OK for all
  5. Delete the folder again.
  6. Finished.

Wednesday, 17 December 2014

Using CA Policy Manager 8.2 behind Web Proxy

As I lately being behind a web proxy when trying to access a CA API Gateway on the AWS Cloud, I run into problems with connecting to thegateway in the internet . Here is the actual solution to make it possible :


Change the file "C:\Program Files (x86)\Layer 7 Technologies\Layer 7 Policy Manager 8.2.00\Layer 7 Policy Manager.ini


add 
-Dhttp.proxyHost=YOUR-PROXY-HOST -Dhttp.proxyPort=YOUR-PROXY-PORT
before -jar entry.

Tuesday, 4 November 2014

First steps with CA API Gateway New Restman interface

The new version of the CA API Gateway, formerly known as CA Layer 7 Gateway or SecureSpan Gateway, brought a new Management Interface. The new Restman Interface is a REST-API with Comprehensive online API documentation.

To install or activate the API do the following :

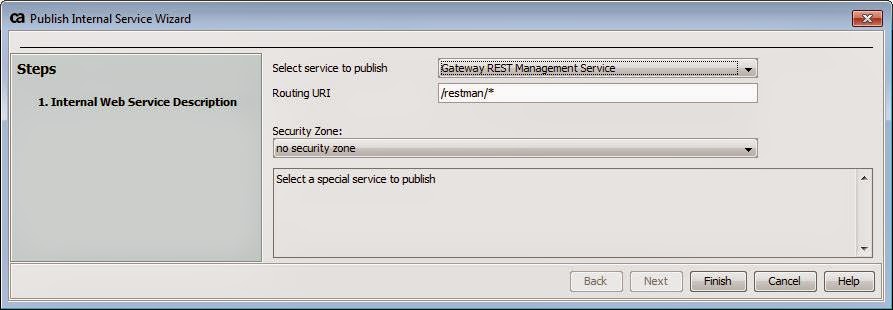
  •  Select [Tasks] > Publish Internal Service from the main menu 

The Publish Internal Service Wizard appears.


  • Choose Gateway REST Management Service from the drop-down list as the service to publish.
  • Optionally, change the Routing URI if necessary. Note: The routing URI must always end with “/*”.


  •  Click [Finish] to publish the internal service. This creates a new service in the root folder named “Gateway REST Management Service”. The REST API is now installed.

Tuesday, 8 April 2014

First steps with Oracle Storage Cloud Service

The Oracle Storage Cloud Service is based on OpenStack which is very obvious as the Oracle documentation is linked to OpenStack.

For the first steps I have requested a trial service, which is 30 days-free trial, through https://cloud.oracle.com/storage.


The service is provisioned after some minutes and the stage ist set for the first "Hello, World"

The data is stored in the form of objects, which must reside in a container. Containers could also be stored in other containers. The objects and containers have default metadata and could be extended by custom metadata. For more details on the archtecture and backgrounds see here.

Steps to be performed
  1. Request a token for the communication
  2. Create a container
  3. Create an object
  4. List the objects in a container
  5. Show the content of an object


1. Request a token for the communication

The URL is from standard Oracle Storage Cloud Service URL "https://storage.us2.oraclecloud.com/auth/v1.0" the X-Storage_user is combined from here service-instance-name "storagetrial4937" and the identity-domain-name here "deoraclegermatrial48847". Both is to be found in the information sent during creation of the account.

To access any of the APIs, a token has to be requested as a first step. This token is used/mandatory for subsequent steps:

curl -v -X GET -H 'X-Storage-User: storagetrial4937-deoraclegermatrial48847:steffen.miller@oracle.com' -H 'X-Storage-Pass: MySecret' https://storage.us2.oraclecloud.com/auth/v1.0

This returns beside much more information:

X-Auth-Token: AUTH_tkb7b10c1b7720a8b677d88a63a005ddd9


2. Create a container through the REST API

The URL is combined from standard Oracle Storage Cloud Service URL "https://storage.us2.oraclecloud.com/v1/" the service-instance-name here "
storagetrial4937" and the identity-domain-name here "deoraclegermatrial48847". Both is to be found in the information sent during creation of the account.

The above "X-Auth-Token" token is used to create the container "myContainer":

curl -v -X PUT -H 'X-Auth-Token: AUTH_tkb7b10c1b7720a8b677d88a63a005ddd9' https://storage.us2.oraclecloud.com/v1/storagetrial4937-deoraclegermatrial48847/myContainer

The return reponse contains
HTTP/1.1 201 Created

3. Create an object

Now we are able to store an object "myObject" in the container:

curl -v -X PUT -H 'X-Auth-Token:  AUTH_tkb7b10c1b7720a8b677d88a63a005ddd9' -d 'Hello, World!' https://storage.us2.oraclecloud.com/v1/storagetrial4937-deoraclegermatrial48847/myContainer/myObject

The response contains 

upload completely sent off: 13 out of 13 bytes
< HTTP/1.1 201 Created

After this step we have created an object "myObject" in the container "myContainer" with the contents "Hello, World!"

4. List the objects in a container

To verify that the object is where we suspect it to be:

curl -X GET -H 'X-Auth-Token: AUTH_tkb7b10c1b7720a8b677d88a63a005ddd9' https://storage.us2.oraclecloud.com/v1/storagetrial4937-deoraclegermatrial48847/myContainer

The response is

myObject
5. Show the content of an object

To read out the contents of myObject we need the following command :

curl -X GET -H 'X-Auth-Token: AUTH_tkb7b77d88a63a005ddd9' https://storage.us2.oraclecloud.com/v1/storagetrial4937-deoraclegermatrial48847/myContainer/myObject

The response is

Hello, World!

So much for now.